Tuesday, May 10, 2016

How to Make a Proper Miter Cut

When I first began working with wood I wanted to know everything (I still do).  Every technique, every aspect.  It all fascinates me.  However, when you want to grab hold of the big picture all at once, it can become overwhelming and easy to overlook the basics.

One of the first tools I purchased when we moved into our home was a Dewalt 12" Miter Saw.  I practiced on a ton of wood making sure that my cuts improved.  A lot of beginners will make an easy and often mistake of where they place the blade in regards to their marker.  This can throw off everything.  Even a 1/16 of an inch can be a mistake that costs money.

The first step to making a perfect miter cut may seem like a "duh" type of thing, however, you'd be surprised how many people don't sharpen the tip of their pencil (insert teenage giggle).  It can throw the cut off so make sure that you sharpen before making any markers.


When marking, make sure you are accurate with where you draw your line.  It should be directly above the line on the ruler.


When you place the piece of wood on the miter, you want to make sure that your blade lines up "outside" your marker.  In other words, if your dimension is 33, place the blade on the side of the marker that is greater than 33.


If you look closely at the blade, you will see smaller teeth upon the larger teeth.  This will add 1/16 of an inch to your cut.  Many beginners (and I did this too) will line the blade up directly with the marker making the cut short.


Making sure your blade is sharp is ridiculously important.  A dull blade will still cut through the wood however it can damage the wood and you will not get a clean cut.

Before you make your cut, make sure you allow your blade time to get up to full speed.  As you cut through the wood, go through slowly.  This will ensure a clean cut.


If you look closely, you can see the pencil marker that I used as the guide.


Tuesday, May 3, 2016

Patching Wood....A Simple Tutorial

One of the aspects of what we do that I really enjoy besides building custom pieces, is breathing life into something someone might be putting by the curb or have just sitting in the basement or attic taking up space.  To me, furniture restoration is not just about sanding and re-painting or staining.  I am a textbook over thinker when it comes to thinking outside the box.  My mind goes in 20 different directions when I first see a piece.  Just endless possibilities.  However, drastically changing a piece's makeup will come with some need for repair.

We often run into a scenario during the restoration process where the integrity of the wood but be repaired.  Of course with time, wood will gain character however some "character" is more wear and tear.  Wood that has chipped or splintered, small holes that might have been caused by one thing or another...I could go on and on.


The first thing we want to do is check for nails that might be sticking out of the holes.  If so, bang the protruded portion of the nail back into the hole.   


When you have a piece of wood that has been chipped or splintered and would like to repair it, you will need to make sure that there is no debris on the work surface and the area effected is flat.  For this, I run a chisel over the area a few times removing any splinters of wood that might still be stuck on.  Don't worry about scratching the wood surface.  We'll be sanding before all is said and done.


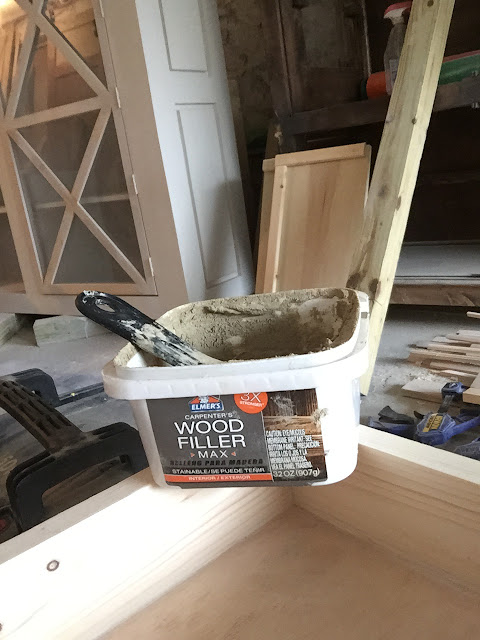
Next on the agenda is to apply the wood filler.  I like using Elmers.  It's strong, mixes well with water and is a strong filler.  Another good filler is Dap.  A little wetter consistency than Elmer's but dries in a very similar way.  Both sand well and are stainable and paintable.  Take a putty knife and apply the wood filler to the area being repaired.  Make sure you don't put too much on but enough as to when you spread the filler, the effected area is covered.  Place aside and allow to dry.  Normal suggested drying time is about an hour, however I find it dries a lot faster.  you'll know it's dry as it will have a stucco like consistency.


Once dry, we take a piece of 220 Grit Sandpaper and sand down the putty to a flat surface.  Run your fingers over the sanded surface.  When you achieve the desired consistency, you are ready roll.


After you wipe off any dust and debris, and clean the surface, you are ready to paint or stain!


Thursday, April 28, 2016

7 Ways to Find Hidden Gems for Close to Nothing


It's not hard to find furniture to refinish, you just have to know where to look to get a good deal. Most of the places below may seem like common sense but that's because they work! We have had a lot of luck with each of these that we wanted to pass along to you.


1. Garage / Estate Sales  


This is the best time of the year to hit up the garage and estate sales. There are some really great websites including GSALR,  Garage Sales TrackerGarage Sale FinderYardSales.net and Yard Sale Search to name a few.  You can try setting up alerts in your area so you don't miss any!


2. Craigslist


Craigslist is typically a popular platform for people to buy and sell furniture because you are able to search based on what is local to you - saving any shipping costs, which can rack up with heavy items. You can think of Craigslist as a virtual garage sale. Just be careful, use good judgement and meet in public locations.


3. Facebook  


We probably use Facebook more than any other platform for furniture. You are able to join multiple groups in your area, get alerts on new items posted and work with people on pricing.

Similar to Craigslist, watch out for scammers and be safe when you are navigating a transaction. Try meeting in a busy parking lot. If that isn't possible (e.g. the item is too heavy or too hard to move) make sure you you arrive with someone when picking up or have someone with you when the buyer comes to your house.


4. Thrift Store / Charity Shop


Try searching in your area for store fronts, or organizations, that receive items as donations, resell them and then give the profit to a charity. There are a few search engines, similar to the garage sales, that you can use - The Thrift ShopperThrift Stores.net and Thrift Store Listings.  By the way, doesn't this photo make you think of Macklemore dancing through a thrift shop with a mink coat! "I'm gonna pop some tags, only got $20 in my pocket"


5. Church / School / Organization Fundraisers


Quite often various organizations will host fundraisers where the members of that organization will bring in items to see and all of the proceeds go back to the organization. Keep an eye out for what events are taking place in your neighborhood - a lot of the time these events will be promoted on Facebook, in community newspapers and, of course, within the organization itself. 


6. Friends, Family and Neighbors


Whenever someone is moving or spring cleaning we make sure to ask them if they plan on getting rid of any furniture. You can usually score some great pieces for close to nothing!

7. Your Own Home


Look around your home and instead of throwing out that old cabinet in the garage put your imagination to the test! You will be surprised at your hidden talent and how easily you can make something you were going to toss look great again. Most old furniture

Tuesday, April 26, 2016

It's All In the Details


I'm still in disbelief that my baby sister has already been married for a year!  Yup, an entire year.  I may be a few days late but at least this is within the same month!


Wasn't she just five years old? Seriously, where has the time gone?   There was this one time that vividly stands out in my memory (maybe because we talk about it all the time) when she LITERALLY stole my Christmas present because it had the Little Mermaid on the front of the shirt. While I was blindsided by the millions of presents our parents used to buy for us, she proceeded to go into the other room and put it on so she could make it known that it was now her shirt.  As usual, I gave in and let her keep it.  I took my role as big sister seriously as you can see from the pictures below.


I think it was Dad who nicknamed her "The Mermaid Freak."  She is still a mermaid freak, however, you would never have known by looking at her wedding - no mermaids, or Sebastian, to be found! Some would say it's a miracle.


But regardless, as her big sister I have and always will have her back.  So, if mermaids are what she wants, mermaids are what she'll get!


Keith and I really wanted to do something handmade and special for their big day.  We talked about some ideas and narrowed in on creating  centerpieces and ceremony alter stands for the floral arrangements.  We were super excited to be involved and that we could provide my sister and brother-in-law with the one of a kind touch they were envisioning.


We worked with them on their vision and walked through some of their inspiration.  They identified that they wanted a refined rustic spring look and we got to work!


Kelli and Pat wanted to flank their ceremony space with two unique wooden stands so the florists could insert flower arrangements.  On a wedding budget, of course, we used pallet wood which worked out perfectly because the contrasting colors gave the altar stands more dimension and character.  The flowers sat right on top and sat on each side of the altar.  Since the stand was rustic in nature Kelli decided to keep in theme by making the flowers vibrant wild flowers.  They were stunning - the bride and groom, too!


This was no small wedding so in agreeing to make the centerpieces, we had unknowingly agreed to making about twenty centerpieces!  Good thing we love them.  We used pallet wood again to tie into the ceremony decor and created boxes for the table arrangements.  The flowers stayed in a vase and sat right within the box, which were offered guests to take at the end of the night.


Getting the wood prepared was the easy part.  There are many different ways to take a pallet apart however any opportunity to use a power tool, we will.  Keith took a reciprocating  saw with a metal blade running the blade between the pallet base and the planks, cutting through the nails.  This will not put added pressure on the pallet wood (which could cause it to break).  It will also retain the character of the wood.


Once you get your pallet separated it's all about putting together the pieces of the puzzle.  Some planks of wood are thicker and wider than others which will affect the thickness and height of the boxes.  If you can, match up similar sized pieces and then put the boxes together.  Once we had the pieces in similar piles we used an 18g Brad Nailer and it went rather quickly.


After we put the boxes together we made sure to sand down each box thoroughly.  We didn't want anyone to get splinters while managing or carrying them home.  Then we added a natural stain to help bring out some of the grain and varying colors in the wood.


To round out the decor, we decided to hand make the table numbers from the same pallet wood used for the ceremony altar and the centerpiece boxes.  Kelli and I spent a full day painting numbers with stencils onto the wood with me being in the early stages of pregnancy and with a two year old in tow. All in a days work.


In order to make the table numbers stand, we cut the pieces of wood at an angle and then used Gorilla Glue to add a small piece of wood to the bottom for stability.


The best part about all of these items is that they don't have to be perfect.  As a matter of fact, they wouldn't hold as much character if they were perfect.  They are relatively simple to make but certainly require lots of time and attention to detail.  We would do it again in a heartbeat!

The centerpiece boxes are currently listed in our ETSY shop. If you are interested in the table numbers or ceremony alter, request a custom order and we would love to help add a special touch to your special day.


Friday, April 22, 2016

If I Had A Million Dollars

Cue "If I had a Million Dollars" by the Bare Nakes Ladies.
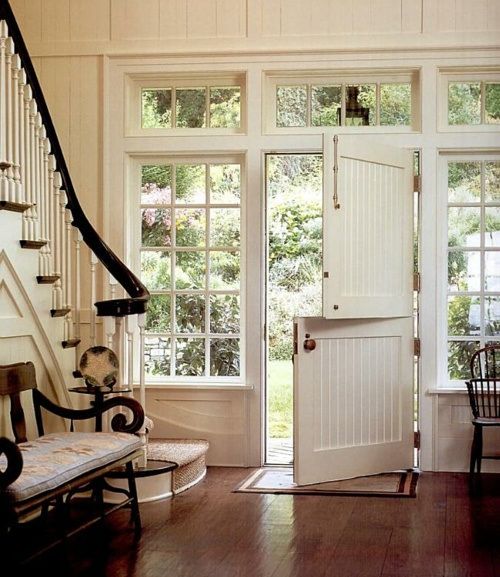
Keith and I are always talking about what changes we would make to our house if we had unlimited resources. Pie in the sky aspirations for the house we raise our kids in. Then we realize that if we did have unlimited resources we wouldn't be living in the same house! Duh!

We try to stay somewhat grounded in our dreams for our home so we wanted to share some inspirational photos and blogs that speak to our realistic capabilities (and some DIY)... until we make that first million dollars, of course!


This beautiful refinished thrift find


A simple garage sale find turned showstopper


One of my favorite paint colors, Gray Clouds, and those eye catching tiles


A cozy outdoor spot for dinner, drinks and star gazing


A jaw dropping dutch door to let the summer breeze roll through