Showing posts with label decor. Show all posts

Friday, April 22, 2016

If I Had A Million Dollars

Cue "If I had a Million Dollars" by the Bare Nakes Ladies.

Keith and I are always talking about what changes we would make to our house if we had unlimited resources. Pie in the sky aspirations for the house we raise our kids in. Then we realize that if we did have unlimited resources we wouldn't be living in the same house! Duh!

We try to stay somewhat grounded in our dreams for our home so we wanted to share some inspirational photos and blogs that speak to our realistic capabilities (and some DIY)... until we make that first million dollars, of course!


This beautiful refinished thrift find


A simple garage sale find turned showstopper


One of my favorite paint colors, Gray Clouds, and those eye catching tiles


A cozy outdoor spot for dinner, drinks and star gazing


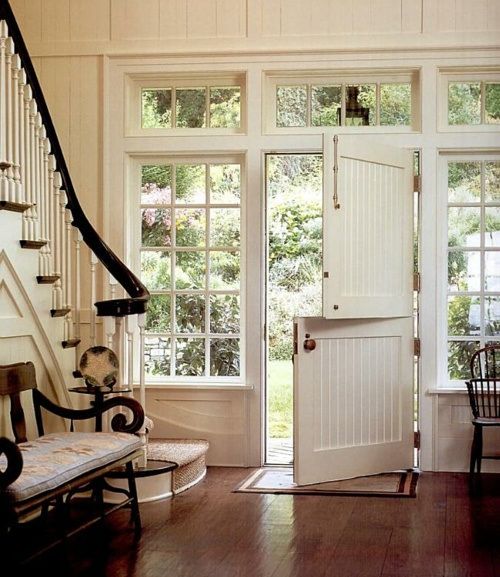
A jaw dropping dutch door to let the summer breeze roll through


Monday, January 12, 2015

Industrial Pipe Curtain Rods


When we moved into our house last September the two projects we wanted to get done immediately were to change all of the locks and to put up window treatments. Well, over a year later and we still don't have all of our window coverings installed - but we're getting there. 

A big part of the delay was trying to determine exactly what we wanted to do. Window treatments aren't cheap so we wanted to be sure what we choose was going to be something we would really love.

Deciding the window treatments for the living room was an easy decision. We wanted to be able to have complete privacy (especially since our front porch looks right into our living room) but we also wanted to be able to allow as much light in as possible - so, blinds were a must. 

We installed the living room blinds knowing that we would eventually add window treatments once we figured out how we wanted to style the room.

The main room that has been the biggest problem for me has been the dining room. It's probably one of the most used rooms in the house, after the kitchen and the living room, and it overlooks our backyard and our neighbors backyard on the side. When I'm in the room I feel like I am in a fish bowl. We have four large windows, all currently exposed, and neighbors close enough that they could probably see in. 


Since moving in we have been doing some work in the dining room (we'll post about the room transformation in the future). We skim coated the walls, added wainscoting, built our dining room table, refinished chairs and painted the walls. It's taking a long time because we keep doing work little by little. 

Now that all of the walls were painted we were ready to talk about the windows! 

The one thing we were sure of were the curtain rods. We knew that we wanted to make them from industrial pipes. Here's how we did it...


MATERIALS:

Note: measurements may vary depending on window width. The window we used is a double window and 74" in width. 


 (2) Pipes = 3/4" x 36"


(3) 3/4" Floor Flanges


    (1) 3/4" Tee


    (3) 3/4" x 1 1/2" Nipples


    (2) 3/4" 90 degree Elbows


    TO ASSEMBLE:

    1. Start with the flanges since they attach to the wall and will be your base
    2. Connect the nipples to the flanges
    3. On two flanges, attach the 90 degree elbows. On the third, attach the tee
    4. Then attach all three flange sets with the pipes (flange/elbow sets will be on the ends and the tee set will be in the middle). If you are using curtains that slide onto the pole attach them now. If you are using curtains with rings you can attach them once the poles are screwed into the wall. You will have to be sure that all three flanges sit flat on the floor because they, of course, need to sit flat on the wall.
    5. We spray painted the assembled rods with Rustoleum's Metallic Spray Paint in Oil Rubbed Bronze to give it a cohesive, finished look.
    6. Time to hang! This does require a level and I suggest starting with the flange/tee in the middle so you can be sure the rod is centered on the window.


    We had these sheer curtains lying around and I thought they would look airy and allow a lot of light to still come through the big windows. After putting them up, I'm not in love. They're much too short and they don't frame the windows the way I would like. They do the trick of providing us with some privacy until we determine an option we like better. 

    Any recommendations?


    Friday, January 9, 2015

    Lucas's Name Rack


    One of the most rewarding things we get to do is make a piece for a good friend.  Especially when that friend just had a beautiful baby boy.

    I wanted to create something original but at the same time, practical.  After trying to find inspiration online, I was striking out.  I knew I wanted to do something with his name on it but not your typical baby gift.

    Just around this time I had come into some great pallet wood.  There was one piece in particular that stood out.  I am all about making things even and neat (it’s just me…I am OCD like that), but nothing about this piece had those features which was intriguing to me.

    I think the fact that it isn't symmetrical is one of its greatest attributes, especially for this project.  It had such great character.

    I started by sanding down the piece to ensure there were no splinters, especially since this is for a baby and may likely be put in his room.

    Next, I put on a pre-stain conditioner and let it set for 24 hours.  When I returned the following day, the conditioner had really brought out the texture in the the wood.

    I sanded it down, once again, to remove any fibers that were lifted from the conditioner and then applied a natural stain.  I wanted to keep the original look of the wood as much as possible.

    At this point, I still didn't have a vision for the final product but then again, I usually never do. My vision usually develops and changes as the project does.

    What helped me with this project was thinking of what I wish my 2 year old son would have.  Since Avery has made a pastime of throwing his coat, clothes and basically everything else on the floor, a clothing/coat rack could be a nice thing to have.

    I choose the simple font of the letters because I didn't the attention to be taken away from the interesting detail of the wood. You can pick them up from Michael's, or any other craft store. OK, now I was seeing the project start to come together!


    I wanted the letters to stand out from the board a bit to create a more three dimensional look.  The other important thing was that this piece needed a touch of color.  Not much but enough to add some vibrancy and life to a piece with otherwise neutral, and mostly natural wood, colors.  Adding the blue and pallet blocks served both purposes.


    To finish off the piece, I added D-hooks to the back for easy wall hanging and hooks beneath each letter so Lucas can hang jackets and baseball caps in the future.


    We are now offering this piece on our Etsy shop and can be customized in a ton of ways!

    Wednesday, November 26, 2014

    Holiday Giveaway: Fuller Glass Document Box

    We are excited to have connected with First of a Kind for a special holiday giveaway. Residing in both Santa Monica, California and Staten Island, First of a Kind focuses on providing discounts of up to 75% off on some of the world's best brands for home. They handpick unique and beautiful designs from around the world - statement pieces! 

    One of those pieces is the Fuller Document Box - the epitome of classic style and sophistication. The clean style with the vintage brass borders and hinges creates a timeless piece that you can cherish for a long time to come. If you are in the tri-state area, be sure to visit their showroom.


    Value $156
    Dimensions: H: 3" W: 12" D: 10"

    Please use the Rafflecopter widgit below to enter. This giveaway is available to residents of the United States. 


    a Rafflecopter giveaway

    This post is sponsored by First of a Kind.