Showing posts with label paint. Show all posts

Tuesday, May 3, 2016

Patching Wood....A Simple Tutorial

One of the aspects of what we do that I really enjoy besides building custom pieces, is breathing life into something someone might be putting by the curb or have just sitting in the basement or attic taking up space.  To me, furniture restoration is not just about sanding and re-painting or staining.  I am a textbook over thinker when it comes to thinking outside the box.  My mind goes in 20 different directions when I first see a piece.  Just endless possibilities.  However, drastically changing a piece's makeup will come with some need for repair.

We often run into a scenario during the restoration process where the integrity of the wood but be repaired.  Of course with time, wood will gain character however some "character" is more wear and tear.  Wood that has chipped or splintered, small holes that might have been caused by one thing or another...I could go on and on.


The first thing we want to do is check for nails that might be sticking out of the holes.  If so, bang the protruded portion of the nail back into the hole.   


When you have a piece of wood that has been chipped or splintered and would like to repair it, you will need to make sure that there is no debris on the work surface and the area effected is flat.  For this, I run a chisel over the area a few times removing any splinters of wood that might still be stuck on.  Don't worry about scratching the wood surface.  We'll be sanding before all is said and done.


Next on the agenda is to apply the wood filler.  I like using Elmers.  It's strong, mixes well with water and is a strong filler.  Another good filler is Dap.  A little wetter consistency than Elmer's but dries in a very similar way.  Both sand well and are stainable and paintable.  Take a putty knife and apply the wood filler to the area being repaired.  Make sure you don't put too much on but enough as to when you spread the filler, the effected area is covered.  Place aside and allow to dry.  Normal suggested drying time is about an hour, however I find it dries a lot faster.  you'll know it's dry as it will have a stucco like consistency.


Once dry, we take a piece of 220 Grit Sandpaper and sand down the putty to a flat surface.  Run your fingers over the sanded surface.  When you achieve the desired consistency, you are ready roll.


After you wipe off any dust and debris, and clean the surface, you are ready to paint or stain!


Friday, April 22, 2016

If I Had A Million Dollars

Cue "If I had a Million Dollars" by the Bare Nakes Ladies.

Keith and I are always talking about what changes we would make to our house if we had unlimited resources. Pie in the sky aspirations for the house we raise our kids in. Then we realize that if we did have unlimited resources we wouldn't be living in the same house! Duh!

We try to stay somewhat grounded in our dreams for our home so we wanted to share some inspirational photos and blogs that speak to our realistic capabilities (and some DIY)... until we make that first million dollars, of course!


This beautiful refinished thrift find


A simple garage sale find turned showstopper


One of my favorite paint colors, Gray Clouds, and those eye catching tiles


A cozy outdoor spot for dinner, drinks and star gazing


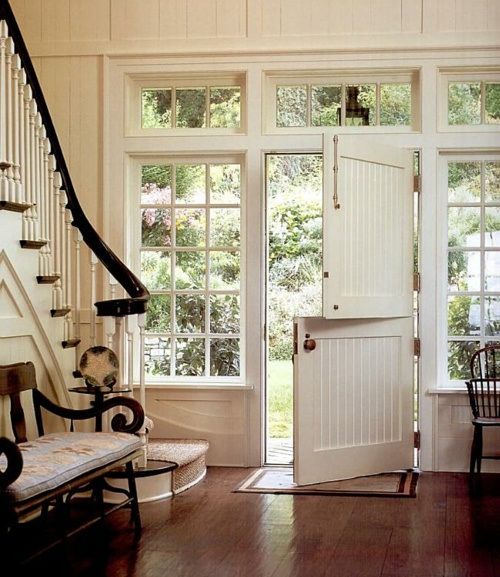
A jaw dropping dutch door to let the summer breeze roll through


Friday, January 9, 2015

Lucas's Name Rack


One of the most rewarding things we get to do is make a piece for a good friend.  Especially when that friend just had a beautiful baby boy.

I wanted to create something original but at the same time, practical.  After trying to find inspiration online, I was striking out.  I knew I wanted to do something with his name on it but not your typical baby gift.

Just around this time I had come into some great pallet wood.  There was one piece in particular that stood out.  I am all about making things even and neat (it’s just me…I am OCD like that), but nothing about this piece had those features which was intriguing to me.

I think the fact that it isn't symmetrical is one of its greatest attributes, especially for this project.  It had such great character.

I started by sanding down the piece to ensure there were no splinters, especially since this is for a baby and may likely be put in his room.

Next, I put on a pre-stain conditioner and let it set for 24 hours.  When I returned the following day, the conditioner had really brought out the texture in the the wood.

I sanded it down, once again, to remove any fibers that were lifted from the conditioner and then applied a natural stain.  I wanted to keep the original look of the wood as much as possible.

At this point, I still didn't have a vision for the final product but then again, I usually never do. My vision usually develops and changes as the project does.

What helped me with this project was thinking of what I wish my 2 year old son would have.  Since Avery has made a pastime of throwing his coat, clothes and basically everything else on the floor, a clothing/coat rack could be a nice thing to have.

I choose the simple font of the letters because I didn't the attention to be taken away from the interesting detail of the wood. You can pick them up from Michael's, or any other craft store. OK, now I was seeing the project start to come together!


I wanted the letters to stand out from the board a bit to create a more three dimensional look.  The other important thing was that this piece needed a touch of color.  Not much but enough to add some vibrancy and life to a piece with otherwise neutral, and mostly natural wood, colors.  Adding the blue and pallet blocks served both purposes.


To finish off the piece, I added D-hooks to the back for easy wall hanging and hooks beneath each letter so Lucas can hang jackets and baseball caps in the future.


We are now offering this piece on our Etsy shop and can be customized in a ton of ways!

Monday, January 5, 2015

Toddler Art Desk


Our little man loves to draw and color (but seriously, what two year old doesn't), so when Avery and I came home one day to find this awesome little desk waiting for him in the middle of the living room, he was ecstatic! He ran to it, started pointing and screaming "wook mommy, wook!" Keith created it with a chalkboard top and ample storage for chalk, crayons and coloring books. It is the perfect little addition to our living/play room. 


It has been sitting in our living room ever since (a good year - I know, embarrassing), unfinished because I couldn't figure out what I wanted to do with it. It wasn't until baseball season came along that I knew exactly what to do - Yankee colors, of course! Avery is following in Keith's footsteps with his fascination and love for baseball. He sees the Yankee logo and screams "baseball!" It tugs at his daddy's heartstrings. 

We were having a project filled weekend this fall and decided to finally tackle finishing the desk with the help of my sister. A little paint and poly, and voila! 


Since then, we have built and designed several other desks for friends and clients along with the chairs and benches. We offer color/design customization and can adjust the size based on the age of  your child. The desk's shown have been used for children 2 years - 5 years. You can find them on our Etsy page. 


Friday, October 17, 2014

Covering Those Ugly Radiators

I remember my parents old kitchen when I was a kid... Dark red wallpaper with a white polka dot design. Little thin blacks vines encompassing the dots as they flowed to the ceiling.  Red linoleum covered the floor with a brick-like design.  It had a closed in feel at times due to the dark colors of the interior.  The one thing I remember distinctively is the wooden radiator cover.  It had a solid composition and was dressed in a very dark stain and shiny poly.  A perforated aluminum screen enclosed the front for ventilation.  When my parents redid their kitchen years after moving in, they installed baseboard heating and the radiator cover was history.

When we moved into our house last September, one of the things that was an immediate eye sore was the exposed radiators in each room - and I mean each and every room!  We had spoken to a plumber friend of ours about replacing them with baseboards and he looked at us like we were insane. He explained how much heat they retain when off and how they are the most efficient source of heat that is no longer made - so we decided to keep them and address the aesthetic issue instead.

I was noodling around Pinterest to gain some inspiration that matched our style but I was continuously striking out. A large majority of them had the aluminum grate in the front which we didn't feel would fit in well with our 85 year old home and our style.  I then saw a cover that was made entirely out of wood with these beautiful slats in the front to allow proper airflow.  I really liked the boldness of the wood than the understated grating.  The Craftsman style also meshed well with our aesthetic taste and would fit in perfectly in the living room... so I got to work.

Here is our latest and greatest! We are so happy how these came out. We used Minwax Natural stain and since these covers will be exposed to temperature changes, we applied three coats of Minwax's Helmsman Spar Urethane (in semi-gloss). I can't wait to make more of these!

BEFORE

Radiators without covers


AFTER

Beautiful Natural Wood Covers


Below is the first cover I completed for our living room. Since we spend most of our time in this room, we wanted to be sure we tackled this cover first to protect Avery. Here is the cover unfinished - I would have left it natural since the grain was beautiful but it didn't match the room - we painted it white semi-gloss to match the molding in the room.


Check out the images below for some of our recent projects.


We are currently offering our custom radiators through Etsy. Since these are custom pieces, please email us for pricing details. Be sure to include the radiator dimensions, preferred style, stain/paint/unfinished and anything else we should be aware of. 

Tuesday, September 16, 2014

Avery's Art Project

I have been wanting to work with Avery for some time now to create artwork for his room. Since moving in, a year ago, we haven't focused on putting up pictures and artwork and I really want his room to be his own space - somewhere he can go for inspiration. This project is great for nearly any age. I had so much fun with him that I want to make one of my own! Here's the details...


Below are the materials you will need:
  • Canvas boards - whichever size you prefer, and however many you want to make
  • Painters Tape -  We used two different widths 
  • Foam brush
  • Acrylic paint - Be sure to use a variation of colors

I was able to start the beginning stages without Avery, so I did the prep work the night before we painted. I started with taking different widths of painters tape and running them in different directions across the canvas. Be sure to gently press the edges (I used my fingernail) to be sure they stick to the canvas. You want to make sure the paint doesn't bleed through and and leave you with funky lines. I also painted the entire board with white acrylic paint as another guard against bleeding paint.


Once the paint dries (approx. 1 hour), it was Avery's turn! We started with the darkest color first using the foam brush.


After that, we implemented a lighter blue to give the colors some contrast. I even added a little white to lighten it up a bit and to make them stand apart even more.

We took a snack break in between the second and third colors. When he wanted to paint again we focused mostly on the third color and this time decided to use his hands. I wanted to make sure almost all of the white canvas was covered so we would distinctly be able to see the white lines. He had such a blast with this part!


Let it dry a good 1 - 2 hours before peeling off the tape to reveal your child's masterpiece!


He was so proud of his artwork and kept pointing to them saying "I did it!" Made me so happy. 

Tuesday, July 22, 2014

Transformation Tuesday: Coffee Table

I found this coffee table at a church tag sale in our town covered by a huge pile of hand-me-down clothes they had on sale.  Protruding from underneath the garment heap were those beautiful wooden legs (insert Pirate joke here).  This sale turned into a gold mine as I scooped up a side table for my living room and a dresser for the guest room as well.


My original idea was to paint the table all black for a chic, clean look.  I wiped the table with a cloth and got down to it. I used Paint Minerals and mixed in some black paint I had left over from our front door project (more on that at another time). It was really easy to mix - All that was needed was to  add the ingredients to a mason jar and shake it for a few minutes until it exhibited a smooth consistency.


After all that paint and a little bit of distressing, this is what the table looked like. Not at all what I had envisioned. It was neither sleek or distressed enough and I wasn't feeling the black, but hey, that's what refurb and DIY is all about right?  Trial and error.


Back to drawing board I went. Since there was a layer of paint on top of a thick layer of poly, I used the lowest grit sandpaper I had in my garage. 60 worked well and within an hour and a half, the top was clean and back to it's beautiful raw state.


This table had beautiful grain and knots that needed to be shown off. I already had Minwax Walnut stain sitting in the garage which was leftover from out dining room table.  I loved how it made the grain pop.  After the stain dried overnight, I lightly sanded down the legs with 220 grit to give it a distressed look.


 A little wax to seal it all and voila! 

This guy is up on the Etsy page for sale!